Tuesday, May 12, 2015

Customizing the Galley to Better Utilize Space

As we continue to spend more time aboard Phoenix, we're really trying to hone in on how to better utilize the space down below. After redesigning the galley, we had a ton of new cabinet space, but we still wanted to maximize our storage as much as possible without making the boat look cluttered. So we decided to get creative and make use of areas under the new cabinets and counter tops.

Better utilization of space in the galley with our new under-the-cabinet spice rack, knife block, and under-the-counter garbage can.
Bill and I both love to cook and we typically carry a lot of spices on board. So one of the first things we chose to add was an under-the-counter spice rack. We found some hinges at our local flea market for an under-the-counter mount, which inspired Bill to use some scrap material to build the spice rack. The sides and dividing shelves were made out of teak, while the underneath side is almond Formica, making it easier to clean. A friend of ours in the dietary supplement business sent us a case of HDPE bottles to hold our spices, and Bill made the rack to accommodate three rows of seven bottles.

Our custom under-the-counter spice rack
The sides and inner shelves of the spice rack are teak while the bottom is Formica for easier clean up
Our spice rack accommodates 21 of our most used spices

Our next task was finding a home for the beautiful mahogany knife block that our friends Tom and Barbara gave us as a wedding gift. The design is pretty clever, in that it has a custom plexi knife guard that keeps the knives in place even when the boat is moving. A pin lock on the side allows you to move the guard out of the way to remove the knives, and then locks the guard back in place for proper stowage.

Our mahogany knife block made by our friend Tom. The pin in the left corner keeps the plexi guard in place and prevents the knives from moving while under way.

Moving the plexi handle guard out of the way to access the knives

Tom originally intended for the knife block to be mounted vertically, but in Phoenix's galley the best place is a horizontal mount under the corner cabinet. Bill made a mahogany mounting block so that the knife block clears our under-the-counter LED lights. Now we have easy access to our knives, yet they are safely secured when we are underway.

Our knife holder mounted under the corner cabinet with the guard in place

Moving the guard out of the way to use the knives

Our latest addition was an under-the-counter garbage can. We've seen similar garbage cans on newer boats with solid surface counters, yet on most of those the garbage can lid has a hole in the top to serve as a lift ring and there are no gaskets; a seemingly stinky option that could also invite flies down below. Instead, we installed a gasketed, water-tight access hatch in the counter to serve as our positive-locking garbage can lid. The garbage can is mounted under-the-cabinet below the access hatch, and either the entire can or the bag liner can be removed to empty the trash.

Our under-the-counter garbage can

The garbage can is mounted under the access hatch and can be easily removed to empty the trash. The gasket and positive lock of the access hatch help minimize odors that may lure pesky flies down below.
The galley is really coming together and is a joy to cook in! Each new addition not only improves our galley storage but really makes Phoenix feel more like a home. We can't wait to move aboard full time!


Monday, March 2, 2015

My Thoughts on Being a Sailor

Ten years ago, if you would have told me that I'd be married, preparing to move aboard a sailboat and transitioning to a life as a cruiser, I would have politely laughed and sent you on your way.

At the time, I was fully embracing city life in Washington, DC, an executive making a name for myself in my chosen industry, and completely engrossed in my single life with no plans of ever settling down. But on some level I was unfulfilled, quietly yearning for something greater than the "ordinary" life that I was leading.

Bill and I met on a work trip more than 2,000 miles away from our respective homes and from Phoenix. I had never sailed before, but it seemed like a great hobby or way to spend a vacation. The notion of sailing full-time was completely foreign to me and something that wasn't really fathomable.

Not that I had an aversion to the water; quite the contrary. Since I was a very young girl, I had always been drawn to the water and felt most at home and at peace while in or on the water. I began swimming at age 2, was swimming competitively by age 6, and naturally gravitated to all water sports, whether white water rafting, SCUBA diving, or racing the 100m or 200m backstroke. Yet I had never aspired to be a sailor.

Everything changed the first time we went sailing. After raising the sails, turning off the motor and feeling the wind fill and lift the sails as we were sailing close hauled, I finally understood the allure of sailing and what it really is.

Sailing, and more specifically cruising, is not the simple act of going out on a boat, searching for puffs of wind to fill your sails and propel you in a specific direction. Sailing is an opportunity, a perspective on life, and an escape from the lull of an "ordinary" existence. Sailing is and isn't many things, but here are a few of the things that stand out for me.

Sailing is independence and self-reliance: Once onboard, especially while passage making, the crew is on its own. We are the cook, the mechanic, the medic, the navigators, the plumbers, the electricians, the housekeepers, etc. We are off the grid, so to speak, responsible for our own safety, and completely reliant on ourselves and our abilities to keep the boat going and the crew alive. The trust and faith we must have in each other and in ourselves is empowering and invigorating, and truly key to our success as cruisers.

Sailing is freedom and adventure: Though it sounds cliche, with the wind in our sails there are few places that we can't go (given the right wind, tide, depth, weather, etc.). Gone are the restraints of carpool lanes, 5-day a week jobs, conference calls, etc. In their place is the freedom to set our own course, plot our destinations and experience the world and its cultural diversity in a meaningful way.

Sailing requires teamwork: Bill and I quit our respective jobs, started a consulting business, and immersed ourselves completely in rebuilding Phoenix and preparing for the adventures and challenges that we'll face as full-time cruisers. There have been challenges and frustrations along the way, and undoubtedly there will be more, but by working together as a team, I believe that we'll be able to tackle each obstacle head on.

Sailing is an extreme sport: Sails are heavy, especially when the wind is blowing and it can be a real workout to raise and trim the sails. Given the size of our headsail, even with over-sized primary winches, in 20 knots of wind winching in the genoa sheets is equivalent to lifting 30 pounds of weights. You may be doing 20-30 reps before the sail is properly trimmed. Basic activities such as cooking can be a workout if you're trying to balance yourself and your food while standing at a 20 degree angle. Even sleep can be a challenge at 15-20 degrees or with waves crashing against the hull. Athleticism, balance, strength, and endurance are all vital for living aboard a sailboat.

Sailing isn't just for "rich" people: Many people mistakenly believe that you have to have a lot of money to cruise. Boats can be expensive, but it is possible to cruise on a budget, and for far less than it costs to live in the States. Most cruising couples can live quite comfortably and spend approximately $20,000 to $30,000 USD ($30,000 to $40,000 for a family of 4) annually. Everyone's budget is different, but if you're willing to do the work yourself, you can purchase a boat and cruise on it for much less than the cost of a house in mainstream USA.

Sailing isn't always a 24- hour activity, nor is it all work: When you're on a passage getting from point A to B, you could be sailing 24 hours a day. As I mentioned above it does take some work to raise and trim the sails. But once the sails are set, unless you're tacking, the heavy lifting is done. And, cruisers spend almost 90% of their time at anchor. This leaves plenty of time for boat work, exploring, socializing, leisure, and just plain living!

Sailing requires patience and resourcefulness: Inevitably, shit happens. When it happens on land, it's easy to head to the store or order something from Amazon Prime and get things fixed quickly. On a boat or in a foreign port, it's not that simple. Hopefully you've had the foresight to stow the right spare parts, material to make sail repairs, etc. If not, you either have to make something, jury rig something, do without, or order something and wait (sometimes weeks or months) for it to be delivered.
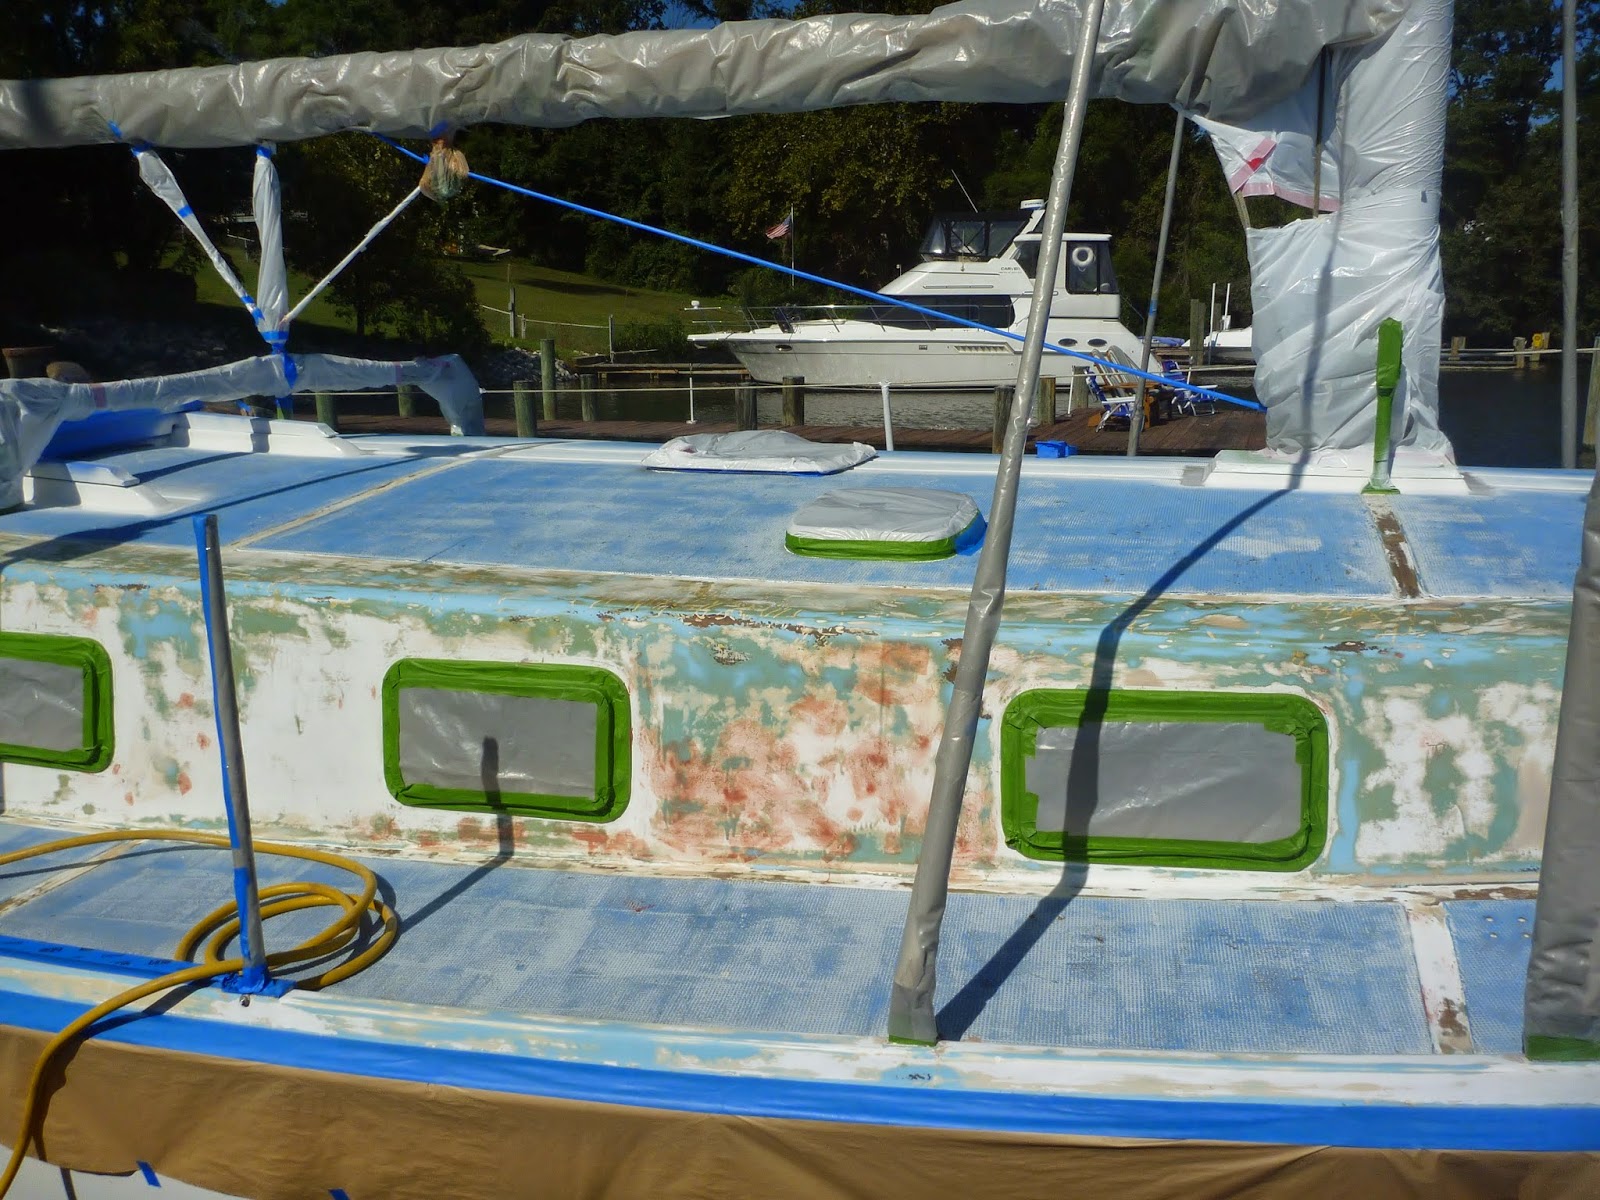
Since Phoenix is a custom boat, nearly all of our rebuild has been "custom," meaning we've had to design, fabricate/build something for every project. Most of what we've needed/wanted for each project either didn't exist or wouldn't fit our intended purpose, so we set out and devised a way to make something that fit our needs. Research, critical thinking, problem solving, and acquiring new skill sets are common daily activities, and inevitably each project takes much longer than you expected.

Ten years ago sewing, splicing, fiberglass repair, physics, diesel, electrical, woodwork, water systems, etc. would not have been part of my daily vocabulary. Today, they're not only common topics, but daily chores that require one or both of our attention when we're working on the boat.

Years ago, I wrote my thesis on colonial history and the psychological transition that takes place as one begins to identify with and relate to their new culture and experiences. These experiences not only shape a person's perspective but redefines how they view themselves and the world around them.

Like the colonists I studied, it's taken me several years to really identify myself as a sailor. I've come a long way from that first sail and from my first solo sail. In all honesty I know that I have much to learn and master, but that's part of the excitement of sailing.

After all, isn't embracing life's lessons and growing with each experience really what life -- sailing or otherwise -- is all about?


Tuesday, February 17, 2015

Galley Redesign

One of the many modifications that sets Phoenix apart from its Andromeda and Christina sisters is the location of our galley. Bruce Bingham's original design called for a mid-ship galley to starboard, running both sides of the passageway leading from the main to aft cabin.

Bruce Bingham Andromeda original interior design
While this is a great galley location for an off-shore cruiser or sailing in cold waters, there is little ventilation in this area (only one port that opens into the cockpit well), and most of the heat is funneled aft into the aft stateroom while cooking.

Phoenix's previous owner began our galley redesign by relocating the galley to the port side of the main cabin, just left of the companionway ladder. In the above drawing, it replaces the door to the head, the hanging locker and shelving aft of the port-side settee. From what we can tell, the entrance to Phoenix's head was always from the aft cabin, so in essence we really only lost a hanging locker.

What we gained instead is a massive U-shaped galley with a ton of storage and counter space, which is not how you'd typically describe a sailboat's galley! Plus, with the 8 opening ports in the main cabin, the companion way, and our overhead skylight, the galley is extremely well ventilated and heat or steam from cooking does not stay down below. But before I jump ahead of myself, here's what Phoenix's galley looked like when Bill found her in Detroit.

Phoenix's galley when purchased
 Phoenix came with a Norcold AC/DC Refrigerator/Freezer, a cutout for deep double sink, and plans for an electric stove top next to the refrigerator. A good start, but with two avid cooks on board, we needed a bit more prep space! The DC refrigerator electronics died on the trip home from Detroit, so that was the first thing to go.

Bill saved the doors, outer framing and seals from the refrigerator, and designed an under-the-counter 6 cubic foot stainless refrigerator box that would accommodate our Norcold door. A new stainless front panel insert helped dress the door up quite a bit. The freezer door will be used on a separate freezer box that's in progress. With the refrigerator under the counter, we were able to extend the counter top amidship almost to the companionway ladder, really maximizing our food prep area.

Between the fore and aft cabinets along the hull, Bill removed the counter top and opened up the lower cabinets to accommodate our gimballed Princess 3-burner propane range. Behind the stove we added a stainless back splash to make clean up easier. We added two shore power/generator GFI AC outlets and another separate inverter AC outlet to the galley, which allows us to run the microwave and other small appliances as needed.

The top cabinets were modified to give an extra-deep corner cabinet and we added two larger cabinets against the bulkhead where the Norcold refrigerator used to be. I'm sure I'll eat these words later once we're living on board full time, but so far I have more galley cabinet space than I know what to do with! Bill also ran under-the-counter LED lights under all of the cabinets to help illuminate the galley with very little power draw.

To really maximize storage and food prep areas, Bill made a 5-drawer cabinet next to the sink. Even though it's a smaller workspace, it's probably my favorite food prep area, especially since its right next to the sink. Having the deep double sink is wonderful for a variety of reasons. Our collapsible  in-sink drying rack fits snugly in one side so we can safely do dishes while underway without anything going flying while we're heeled at 20 degrees, and you can safely stow open bottles, etc. in the sink while prepping or serving beverages.

Phoenix carries 200+ gallons of fresh water, but we don't go through the water that quickly and we're pretty picky about our drinking water, so we installed a 7 gallon drinking water tank under the sink cabinets. The Nalgene tank can be easily cleaned, won't leach plasticizers, and can be filled directly or from our Echo-Tech RO water maker. We have a foot pump for the drinking water spigot while the sink pulls water from our main tanks for washing dishes, etc.

Phoenix's new galley layout with extra cabinets, under-the-counter refrigerator, gimballed stove, microwave and new drawers. The camp stove will go away once the propane system is installed (LOL)

New galley drawers with African mahogany drawer faces

Galley and port-side settee
New galley sink with built in soap dispenser. The small spigot on the left is for drinking water and is controlled with a foot pump.
As soon as the weather gets warm enough to start working on the boat again, Bill's going to finish installing the hot water plumbing from our 20-gallon hot water heater to the galley sink, finish the propane system to the stove, and mount the refrigerator's Keel-Cooler compressor to finish that project.

In the meantime, Bill's been in his workshop creating some other galley customizations for me that I'll share with you soon -- I really am lucky to have such a handy husband!


Wednesday, January 14, 2015

Building a Custom Fiberglass Propane Locker

As we continue outfitting Phoenix, one of the many questions that we've been pondering is where we're going to put the propane tanks? In Bruce Bingham's original Andromeda design, there was plenty of space between the main cabin and the main mast to allow room for a deck box to store the propane. However, one of Phoenix's previous owners extended both the main and aft cabin tops, so there's no room for a deck box on the foredeck.

As a stop-gap solution, we've used 1 lb propane tanks and Bill attached a 20 lb tank to the stern rail with a L-bracket that he made. While effective in the short run, we wanted something that was more secure and would permanently house two 20 lb propane tanks, and that vents overboard off Phoenix's stern.

Our temporary propane tank holder -- a L bracket attached to the stern rail and holding the tank in place with stainless hose clamps

We began researching different above deck propane locker options, and weren't really happy with sizes we found commercially available. Trident makes a really nice propane locker, if you're willing to spend $1,000+ for a box. That seemed a bit crazy to us, especially since the dimensions of their propane locker are too large to fit under Phoenix's stern rail.

Nothing we found really fit our needs, so we started to design our own propane locker. We began by purchasing a 12-inch cement form from the local Home Depot. There was a surprising amount of size variability between the "12-inch" tubes at our Home Depot, so we had to sort through the stack in order to find one that was truly 12 inches in diameter.

Bill cut down the cement form to make two tubes of equal height and then used some spare cardboard to make a bottom and to fill in the gap between the two tubes. He used packing tape to hold everything together and then systematically covered the cardboard exterior with more packing tape. Viola, his  "Frankenform" was complete!

Making our propane locker form out of cement forms

Bottom view of the propane locker form

Top view of our propane locker form. Each 12" tube is large enough for a 20 lb propane tank

We painted PVA mold release on the form, and then applied one layer of 10 oz Hexel fiberglass cloth, 2 layers of chop mat and a final layer of 10 oz. fiberglass cloth to the form with fiberglass resin to get the desired thickness. Once the resin was fully cured, we removed the cardboard form from our fiberglass shell and checked for fit. We purposefully made the locker taller than we needed, and Bill used a hacksaw to cut the fiberglass base to the desired height and to get a clean edge.

Several layers of fiberglass and resin on the propane locker base


Cardboard form removed from our propane locker base

Cardboard form removed from our propane locker base

Perfect fit for two 20 lb propane tanks!
Cutting the propane locker base to size and making a clean edge
We followed a similar process for the locker's lid and made it slightly larger than the base. However, we incorporated some exterior grade plywood (5/32") to help add some weight and stiffness to the lid.

Fiberglass and resin on the propane locker lid before removing it from its form
Once the lid was done, it was time for dewaxing, fairing and preparing to paint the propane locker.

Propane locker base fair and ready for primer

Propane locker lid with primer

Propane locker base with primer

Nice high gloss with the finish paint
Our new custom fiberglass propane locker


With the propane locker painted it's time to move on to installing the propane system and making it ABYC compliant. 


Thursday, January 8, 2015

From the Galley: Stove Top Pita Pockets or Flatbread

We love making (and eating) fresh bread, but it's not always feasible to bake on board, especially when underway. Last summer we experimented with making flat bread under sail and while at anchor, and were really pleased with the results.

The great thing about this recipe is that you can make the dough ahead of time and refrigerate your dough for up to a week. We make these on the stove top, but you could also bake and or cook these on the grill, if you prefer.

Homemade Pita/Flat Bread

Ingredients:
1 cup warm water (roughly body temperature or slightly warmer)
2 teaspoons yeast
1/4 teaspoon sugar
2 1/2 cups flour (we use unbleached) plus more for kneading
1 1/2 teaspoons salt
2 teaspoons olive oil

Preparation:
Mix the warm water, sugar and yeast together and let sit for 5 to 10 minutes to "proof" the yeast (it should be well dissolved with bubbly foam on top).

Meanwhile, combine flour, salt and olive oil in a large bowl. Add the water/yeast mixture to the bowl and stir until a shaggy dough is formed. Knead the dough in the bowl or on a lightly floured surface, adding just enough flour to keep the dough from sticking to your hands or the sides of the bowl. (Tip: I lightly spray my hand with olive oil before kneading to keep the dough from sticking and to help minimize the amount of flour used). Continue kneading until the dough is elastic (5-10 minutes).

Wash the bowl you used to mix the dough and coat the sides with a little olive oil. Set the dough in the bowl and turn it to coat with oil. Cover with plastic wrap and let the dough rise until it's doubled in size (1-2 hours depending on the ambient temperature).

Gently deflate the dough and turn it on a lightly floured surface. Separate the dough into eight equal pieces. If you're making the dough ahead, wrap the pieces in plastic wrap and store in the fridge until you are ready to make them. If you want to make a few now, return them to the bowl, cover with plastic and let them rest for another half hour or so. (Tip: you could make them right away, but they don't usually puff up as well into pita pockets. If your pitas don't puff, use them for flat bread pizzas).

Pita dough pieces, wrapped in plastic wrap and ready to cook or store in the refrigerator

When you're ready to make the dough, lightly flour your working surface. With a floured rolling pin, roll one of your dough pieces into a circle (doesn't have to be perfect) about 1/4 inch thick. It will typically be about 6 inches in diameter. Lift and turn the dough frequently as you roll to make sure it doesn't stick to your surface. Continue with as many pitas as you're making that day.

Roll until your dough is roughly 6 inches in diameter and/or 1/4 inch thick

Meanwhile, heat up your skillet. We use a flat, cast iron tortilla skillet. (Even on a boat, cast iron is excellent to cook with, as long as you take care of it, season your skillets and cover them when not in use). If your skillet isn't hot enough, the pita will not puff. Once you're pan is very hot (water droplets should sizzle immediately on contact), lay one rolled out pita on the skillet and cook until small bubbles start to form, about 30 seconds.

Ready for it's first flip
Turn your pita over and cook for a few minutes on the other side, until air pockets begin to form. Rotate while cooking so you don't burn your pita in any one spot. Flip your pita once again and cook for another minute. The pita should start to puff up during the second and third flips. Gently pressing the surface of the pita with a spatula will help increase the size of the air pockets.

Air pockets forming

Pita pocket ready to eat

Remove the pita from heat and continue cooking the remaining pitas, if any. They are much better served fresh, but you can store them for a few days if desired.

Puffed pitas can be cut in half and filled with your favorite sandwich filling (crab salad, tuna salad, etc.)

Don't worry if you're pitas don't puff. This usually happens if you're skillet isn't hot enough, or if you use the dough immediately after the first rise. They still make wonderful flat bread pizzas, or can be baked to make pita chips, or torn into pieces for dipping.

Pita pockets ready to serve. Could be stuffed for sandwiches, but these are ear-marked for flat bread pizzas tonight!

Enjoy!


Friday, January 2, 2015

Painting Meandrous

Happy 2015 everyone! With the New Year upon us, it's time to catch up on the blog and to get you up do date on what we've been up to over the past few months.

In our spare time, when we're not working on Phoenix, Bill and I busy ourselves prepping for life as live-aboard sailors. Part of that process involves tackling the sometimes overwhelming task of downsizing and parting with all of the "stuff" that accumulates over time.

Aside from finishing Phoenix, there are three big hurdles to overcome before we can really begin our cruising adventure. We accomplished the first just after returning from our 2 week trip -- we sold our sports car! The second big hurdle is getting Meandrous  -- our beloved Yorktown 39 -- on the market. The third will be listing the house, and hopefully that will happen this year.

Bill purchased Meandrous as a previously owned but never finished bare-hulled kit boat. He painstakingly designed, rigged the boat, built and finished the interior in gorgeous, old growth teak. Bill lived aboard Meandrous for several years on the Potomac and she was the first boat that I ever sailed. We have many wonderful memories with Meandrous, yet now that Phoenix is in sailing condition, it's time for Meandrous to have new owners that can enjoy her as much as we always have.

We want Meandrous to look her best when she meets her new owners, and we want to give her a proper sendoff, so we both agreed that it was time for a new paint job. Her topsides were in great condition, so the focus was on the deck and non-skid.

We used Awlgrip when we painted Phoenix and haven't been happy with how the paint holds up over time. Air pollution (specifically jet fuel from airplanes overhead and soot from our local coal-burning power plant) is not Awlgrip's friend. The pollutants quickly etched and ruined the surface of the paint. It also does not seem to be compatible with UV 4000 or other marine caulks, and the paint lifted and tore from the substrate in areas where we used UV 4000.

We painted Phoenix's mizzen boom a few years back with Interlux's Perfection, and we have been much happier with that paint than Awlgrip. So for Meandrous we decided to use Perfection in Mediterranean White.

As with any paint job, the quality of the finished product is directly proportional to the prep work, so the first step was the meticulous process of sanding and fairing. Much of the old paint was sanded down to the the gel-coat, and we used fairing compound to fill any cracks, voids or other imperfections.

Sanded to the robin's egg blue gel-coat, taped and ready for primer


Meandrous' cockpit ready for primer
Once we were happy with the prep work, the next step was taping off and/or papering all of stanchions, cleats, tracks, ports, deck mounts, etc. and removing all of the caulk from around the ports, hatches, and deck fittings. Then it was time for the primer. We used Interlux Primekote, a two-part epoxy primer that both fills and seals the substrate. We liked working with Primekote better than Awlgrip's High Build (filler) and 545 (sealer) primers. Not that those primers were bad per se, but the Primekote did the job of both Awlgrip products with fewer coats. Bill sprayed two coats of Primekote, and we sanded between coats with 120 grit paper. We sanded with 320 grit after the second coat, and it was time for the Perfection topcoat.

Starting to put down the first coat of primer

Cabin top and sides primed

Painting outdoors has it's challenges and delays, and we had to wait for the right weather window to spray each coat. The temperatures had to be above 50 degrees, we had to have enough time for the solvents to flash off and the paint to cure before the evening dew set up, and the winds needed to be light enough not to effect Bill's ability to spray the paint or to blow any debris into the wet paint. Since we were painting in the Fall we also had to worry about getting the job done before the leaves began to fall as well. Needless to say, timing was everything.

When the weather window was right, Bill sprayed the Perfection topcoat while I served as his trusty hose-tender -- keeping the air hose from dragging through any of the wet paint and carefully removing any bugs that flew into the paint with forceps.

Perfection Mediterranean White in the cockpit

Glossy finish


We were really pleased with the high gloss finish, and with the topcoat done it was time to remove the tape/paper and let the paint set up before moving on to the non-skid. Depending on the temperatures, it's recommended that you wait 24-72 hours before taping Perfection. Even though we added accelerator the Perfection (to help protect the gloss from the heavy dew), we wanted to give the paint ample time to harden before taping, so we were once again waiting for the right weather window.

We used KiwiGrip when we painted the non-skid on Phoenix, and we continue to be happy with it's performance. We decided to use it on Meandrous too, but this time we opted for gray KiwiGrip to contrast the Mediterranean White gloss finish. We followed the same application process of troweling on the paint, then using the loopy-goopy rollers to go over Meandrous' molded non-skid pattern. The gray was lighter than we initially expected but still gave a subtle contrast, depending on how the light hits it, and was still light enough that the deck shouldn't get too hot in the summer.

We hated to paint over the molded non-skid since it was so tenacious and we didn't want to fill the grooves with paint, but from a purely aesthetic perspective it needed a face-lift. To our pleasant surprise, the KiwiGrip settled and shrank into the existing non-skid pattern and really cleaned up the look while maintaining the tenacity of the original non-skid. Since the weather was relatively cool and we had to work in sections, moving around the boat took several days. We painted some "squares" in one area of the boat while allowing other areas to cure and harden enough to walk on them, until we finally made our way around to all of the "squares."

Forward section of cabin top taped and ready for KiwiGrip

Forward section "after" KiwiGrip


Working our way around the cabin top
With the non-skid finished, we were finally ready to prep and paint the ports, then apply the finish bead of caulk around all of the ports and hatches and really button up the boat.

It took three months to finish the job in its entirety, though we're really happy with how Meandrous looks now. Hopefully when we put her on the market in the Spring and she meets her new potential owners, they will love and appreciate her as much as we have over the years.

KiwiGrip done, ports painted and caulked
s/v Meandrous