Showing posts with label Rigging. Show all posts

Thursday, August 7, 2014

Lazy Jacks

Phoenix's 9.8 ounce, 448 sq. ft mainsail is very heavy and stiff. When Bruce Bingham first visited us for our initial sail and he helped me flake the sail, he laughed when I told him that I'd eventually beat the sail into submission. He had little faith that at 5'2" I'd be able to tame our mainsail.

Flaking the mainsail had been a chore to date, and luckily the hardtop dodger and bimini that we built is strong enough that we can crawl, and even walk on top to wrestle with the mainsail. However, we're getting ready to install our solar panels on top of the bimini, which will limit our crawl space on top. It was fortuitous that our local West Marine was going out of business and all line was marked down 75%, so we decided it was time to make and install lazy jacks to make flaking the sails a much easier task.

When we made our sail covers, we didn't install slits to accommodate lazy jacks, and we knew we wanted lazy jacks that we could pull forward to the mast to get out of the way when we cover the sails. After quite a bit of online research, we decided to make a 4-legged lazy jack system similar to what John from Morgan's Cloud created, but modified slightly for Phoenix's main and mizzen sails. John does a good job of describing the measurements needed for determining the lower line termination and attachment points, and the basics of the overall system can be proportioned to any boom.

We used 1/4" double braid line for the lazy jacks, and knowing how to do your own double braid eye splices definitely came in handy for this project and helped maintain the cruising kitty, as each side of the lazy jack requires 5 eye splices (10 per mast, 20 in all since the Andromeda is a ketch rig). Local riggers charge $20 per splice, not including the price of the line, so 20 eye splices would definitely hurt the pocket book! Contrary to many lazy jack systems we've seen online, ours didn't take nearly as much line. We used 150' of line for the main's lazy jacks, and 120' of line for the mizzen.

Unlike Morgan's Cloud, we decided against using blocks in the upper sections of the lazy jacks and cheek blocks along the mast. To minimize chafe, we felt stainless O-rings would be a better choice against the sail on the upper segments. Along the boom we opted for eye straps, partly because we had them on hand, and partly because the system doesn't really have much load or friction, so we didn't think it warranted going out and buying new cheek blocks at the time.

There are basically three lengths of line on each side of the lazy jacks -- the upper/mast termination section, the middle section, and the longest length of line that attaches to the boom and serves as the 4-legs. The mast termination length has an eye splice at one end, and an eye splice with a stainless O-ring at the other end. The middle section has eye splices with O-rings on both ends. And the boom termination length has an eye splice on aft end.

To minimize noise and additional holes in the mast, we attached the upper end  to the lower shroud tangs, just  below the spreaders with a bale sling hitch.

Bill installing the upper, mast termination leg of the lazy jacks on our main mast

Bale sling hitch
The middle section was attached to the upper piece with a cow hitch through the upper's O-ring. The lower section was also attached to the aft section of the boom with a cow hitch, and the un-spliced end was lead forward -- through the aft middle O-ring, down through the eye straps, back up through the forward middle O-ring, and to the cleat on the forward section of the boom.
 
Close up of lower line going through the middle section's O-ring

Cow hitch on aft section of boom
Lazy jacks installed on the main

It helps to lay out the design on paper and dry fit before cutting the lines and putting in the eye splices. If you take proper measurements and think of the of the various segments as either a 90 degree triangle (upper and middle legs) or close to an equilateral triangle (lower legs), you can get fairly close to the correct line lengths needed. Essentially:
  • The upper leg length is the hypotenuse of a 90 degree triangle that terminates several feet directly over the middle of the cleat and eye strap. 
  • The measurement for the foot of the upper triangle can be measured on the boom
  • The forward leg of the triangle is total height (boom to lower tang attachment) minus 2 times the height of the lower triangle. In our case, each vertical leg height was approximately 1/3 of the boom to lower tang measurement. 
  • Calculate the middle leg as if it were a 90 degree triangle to get the approximate length of the hypotenuse. 
  • Once you've calculated all the lengths, dry fit with some cheap line. 
  • If all of your calculations are correct, the only line you may need to adjust/shorten is the back leg of the middle section. 
  • Keep in mind that if you want to collapse the lazy jacks and pull all the lines forward like we do, much more line is needed on the lower leg.

Sailing with the lazy jacks on the main
It took a little playing with the determine how tight/slack to make the lower legs so that the sail drops properly, but the system has plenty of line to allow us to experiment and pull the entire system forward when we cover the sails. If we have them deployed when raising the sail, you need to really make sure to point the boat into the wind, otherwise the battens can hang up on the lines. This is really important for a full batten sail like our mizzen, but equally important for our 3/4 batten main.

Phoenix's lazy jacks

With the lazy jacks in place, it is much easier to drop the main and mizzen without either sail flopping around the deck. Flaking both sails is much easier as well: simply pull the flakes aft to make them neater, attach the sail ties, and voila!

Our system was certainly cheaper than the commercial lazy jacks on the market, are tailored to fit our rig, and are very simple/easy to use. The more we use them we definitely agree with John from Morgan's Cloud -- there's really no reason for the lazy jacks to go up higher than the spreaders. Also, the system doesn't need to be wider than the mast width (i.e. attached out under the spreaders) in order to properly cradle the sail.

We do lead the lines forward every time we cover the sail (we're pretty particular about protecting the sail from excess UV damage). Eventually we may add slits to the sail covers so that we can keep the lazy jacks in spot all the time, but it's so easy to deploy and/or stow the lazy jacks at this point, I'm just thrilled that my wrestling days are over!

Wednesday, April 30, 2014

What a difference a new headsail makes!

We were able to sneak some sailing in this weekend to test out the new genoa -- after the gale winds and before the torrential rains began.

Eventually gale winds shouldn't be a problem for an Andromeda like Phoenix -- especially with the mizzen and new staysail -- but when testing the initial performance of the new headsail, it seemed prudent to wait for more moderate air.

We had NW winds at 10-15 knots and we started things out sailing on a downwind run with a full main and genoa. The sail shape looked great and we were cruising along at or slightly faster than the apparent wind. The helm was easy (as you'd expect) going downwind.

On both a broad and beam reach, Phoenix picked up speed and we were comfortably doing high 5s to low 6s with very little effort. Admittedly we weren't breaking any records, but a respectable speed given the relatively light air.

We could never get this nice of a slot with the old headsail!

It was chilly out there!

Looking up from the foredeck

Genoa on a broad reach

Upwind sailing was going to be the true test, since our old, bagged out sail caused excessive weather helm when sailing close to the wind and we typically heeled at about 20-25 degrees. With the new sail, Phoenix heeled over quickly then stabilized at about 15 degrees, and we were really able to flatten the new headsail and maintained excellent helm control.

For kicks, we reefed the headsail a few turns (about 10%), and the rope luff did a great job keeping the luff tight and the sail flat. Bill let out the sheeting a hair and we were heeled at about 10 degrees and picked up a bit more speed.

With the new canvas, Phoenix's upwind performance is 1,000 times more enjoyable! After a bit more fine tuning of the rig and sheeting, we're sure that her performance will be even better!

Over the years we've seen too many people unwittingly wait way too long for new sails and wonder why their boat isn't performing as well as it should. As sailors we spend so much time and effort on other improvements and maintenance projects that sadly the sails are often the last thing to get replaced.

If we can offer any advice, pay attention to your sails and how they are wearing over time. I didn't realize that a bagged out sail could cause such a difference in sail performance, but I'm a true believer now!


Wednesday, April 23, 2014

Phoenix Has New Sails!

When we bought Phoenix, she came with a main, mizzen, 140% genoa, a storm staysail, and gennaker -- all of which were made by North Sails in their loft outside of Detroit.

Just before we began sailing, the Annapolis North Sails loft made us a new main and our Phoenix logo was added with the help of North Graphics. We went with a 9.9 ounce Dacron cross-cut main with 3/4 battens, two reef points, and with excellent controls so we can really flatten this sail when sailing upwind or in heavy air. Jonathan's team did a great job constructing the main and we've been very happy with it thus far.

Checking out the main while sailing under the Chesapeake Bay Bridge
After several sailing trips last year, we decided that it was time to replace our 140% genoa. The 6 ounce cloth was really a light air sail and the laminate material was past its prime, causing the sail to bag and move the draft too far aft. Moving the draft aft caused Phoenix to heel excessively when sailing upwind and was causing some weather helm.

Shopping for new sails can be a daunting task -- not only are they expensive but there is a ton of information and hype to wade through in terms of cuts, fabrics, and sizes. Shopping at the boat shows helps quite a bit because you typically have all the major sail lofts within walking distance so you can talk to each, compare prices (and boat show discounts), and ideally get them to sharpen their pencils and give you the best possible deal for your money.

Since our primary plan is to cruise, we knew we wanted durability in our new headsail, but we didn't want to sacrifice sail shape and performance. We often reef the headsail on the furler and didn't want to compromise sail shape, but we didn't want to completely break the bank either. This meant that the high tech laminate materials were out (based on price, even though it would make a lighter sail) and we didn't want to go with a cross-cut sail either -- you can never really get good sail shape with a reefed cross-cut headsail on a roller furler.

Tri-radial sails can give you much better sail shape when reefed and have a much flatter cut, which would help reduce heeling when sailing upwind. The downside is that they take more fabric and man-hours to make since there are more panels to sew together, making them slightly more expensive than cross-cut sails.

For bigger headsails, many sail lofts are moving away from foam luffs and switching to rope luffs. The foam can crush, mildew, and degrade from UV exposure over time. The rope luff reefing pad is made up of three staggered lengths of polypropylene line sewn into a sock at the luff of the sail. The rope luff won't crush, won't mildew, is more UV stable, and helps flatten the sail as you reef. Supposedly it's "easily" replaced if necessary, but that remains to be seen at this point.

After meeting with Doyle, North and Ullman at the boat show and comparing bids, we opted for a higher cut, tri-radial 130% genoa with a rope luff, and a sail area of 755 square feet.

Jerry from the Ullman loft in Deltaville, VA gave us a very competitive bid for the headsail using Dimension-Polyant's ProRadial woven polyester fabric. ProRadial has almost no crimp, and is woven on the same looms as Dimension-Polyant's HydraNet sailcloth. We opted for 9.9 ounce fabric for most of the sail with 8.9 ounce near the luff. Since we chose the heavier fabric, we went with a Sunbrella sacrificial cover rather than UV Dacron like we had on the old genoa.

New genoa on deck and ready for installation
Tri-radial cut with rope luff after initially hoisting the sail
Bill checking out the new headsail

Dock sailing at its finest!

We also had a new 230 square foot staysail made to round out our sail inventory. Since our staysail is a hank-on, we went with a cross-cut design using Challenge 9.62 High Aspect 104 sail cloth.
 
New cross-cut staysail
Jerry from Ullman Sails did a great job constructing the new sails and we are very pleased with how they turned out. Now all the sails are all on board, the water tanks are full and Phoenix is ready to head out. We can't wait to see what a difference the new sails make.

Stay tuned for next week when we share more pics and our findings!

Monday, April 9, 2012

Double Braid Eye Splice

With the wire-to-rope splices done it was time to move on to the two remaining halyards -- the spinnaker and the staysail. These are all line, so they needed an eye splice with a thimble and shackle attached. Most people would start with the eye splice and graduate to the wire-to-rope, but I've never been one to follow conventional wisdom!


When you get the hang of it, eye splices are relatively easy; you just need the right tools for the job. Fids are essential, but ridiculously overpriced. New England ropes has a great chart detailing the appropriate "fid lengths," which vary depending on the size line you're using. Bill used the measurements (and diameters we found online) to make me several fids out of aluminum knitting needles. They were a huge savings, and since they come in pairs I was able to use one as a fid, and the uncut needles served as the "pushers" needed to push the fid and line through the splice.

Once you have all of the tools, you start by measuring one "fid" length on the end of your line. This will be the amount of cover that eventually gets inserted back into the line.

Next you determine the size eye you want to make, and make a second mark. In this case it was dictated by the size of the thimble. Move up the line about 5-6 more fid lengths, and tie a jamming knot. Then go back to your second mark and extract the core from the cover.

Hold on to the core and "milk" the cover towards your jamming knot and back again a few times to "equalize" the lines. Your core should now be a bit longer than the cover. Make one mark on the core where it now exits the cover. Pull more of the core out and make a mark one short fid from the initial mark. Then another mark 1 1/2 fid lengths further down the line.

To make a more streamlined splice, you should taper the cover before feeding it into the core. Extract a few strands every inch or so from your first mark down towards the end of the line and cut them flush with the cover. IF you are adding a shackle, this is also the time to slide it on the core -- it will be too late after this point.


Now, insert your fid into the core at the short fid mark, and feed it through until it exits from your third mark. Put your cover end into the fid and use a "pusher" to move the fid and cover through the core. Tie a small knot at the end of the cover so it doesn't go back in while you're working on the next step.

Feeding the core into the cover is a bit trickier, since it will be a tight fit towards the end of the splice and if you force it too much, it will bunch up an seize. Insert your fid into the core at your first mark, and feed it through, past the point where you originally extracted the core and keep going about a short fid length. If it gets to tight, pull more core out. This also helps ensure you didn't snag any lines along the way. Put the end of the core inside the fid and use your pusher to move the fid and core through the cover. Once it's through, pull it tightly to remove any bunching at the "cross-over" (essentially the juncture where the cover and core meet). Hold on to the cross-over and smooth the line out.

Taper the ends of both the cover and the core so they essentially disappear back into your splice.

Your splice is now essentially done, except it's a bit oversized and you need to milk the cover back over itself to close your splice. Find something secure (a winch, a fence post, etc.) and belay your jamming knot to it. Hold firmly on your splice and milk the cover back, keeping tension on your splice the entire time. IF you're using a thimble, make sure you put it in spot before the eye closes too much. Milk slowly, being careful not to bunch up the line. Give it a few tugs, snaps, bends, etc. until the core moves all the way around the eye. The bigger the line, the more tension, tugs and muscle you'll need to get the job done, but in the end, you'll have a great looking eye splice that maintains the full strength of the line!


Monday, February 27, 2012

Replacing Wire-to-Rope Halyards

Perhaps it was because Phoenix sat so long in Detroit (10+ years on the hard with her masts down), or perhaps it was because of how the masts were stored, but her halyards were riddled with meat hooks that wreaked havoc on our hands! Plus the lines were all quite worn, so we decided it was time to replace them all.

The main halyard is all wire, making that replacement relatively easy. Except the guy who sold us the stainless wire didn't give us oil-free stainless, so it made a huge mess all over the deck until the oil finally all came off. Suffice it to say we were not happy, especially when it came time to wash the decks and get all the gunk off!

The mizzen, mizzen staysail, and two headsail halyards are wire-double braid line, so some splicing would be in order. We could've purchased pre-fabricated wire-to-rope kits for the two mizzen halyards, but the headsails didn't fit the pre-fab mold and would have to be custom. Shopping around Annapolis, the going rate for a rigger to do a wire-to-rope splice ranged anywhere from $50-$100 each! Perhaps out of naiveté or the fact that I love a challenge and to learn new skills, I volunteered (or maybe Bill volunteered me?) to learn how to do the splices. We are, after all, always looking for ways to become more self-sufficient.

It's amazing the reaction you get in the chandleries when you say you're going to splice the wire and rope yourself. Blank stares, hushed voices, wide-eyed recoils and disbelief while they wish you luck, tell you how hard it's going to be, how these splices are a nearly lost art... Almost enough to make you feel like a Jedi knight looking for Obi Wan! But I was non-pulsed; I've been braiding hair since I was a little girl, how hard could this be?

We did our normal internet searches, watched some YouTube videos, knew I would need a Swedish fid, and had the basic concept of splicing down, but I'll be the first to admit that my first attempt was a hot mess! Mistake #1 -- assuming the splice was anything like braiding. In fact, this was probably my downfall as I attempted to weave the line against the lay of the wire, like you would with a braid or most 3-strand splices. While presumably strong enough, it certainly wasn't a smooth taper, was difficult if not impossible to slide the cover back over the wire and core splice, and definitely did NOT neatly spiral around the wire like the professional splices we've seen.

Determined not to accept defeat, we purchased Brion Toss' book -- the Rigger's Apprentice. I dove in, but his descriptions seemed to be clear as mud and I was again frustrated. We grabbed some old 3 strand line off the dock and sat at the dining room table for hours with the book and line, practicing and trying to figure out how to get the elusive spiral down. I was even dreaming of splicing! Finally my epiphany came, I could visualize what Brion was talking about, and I was ready to attempt my next splice.

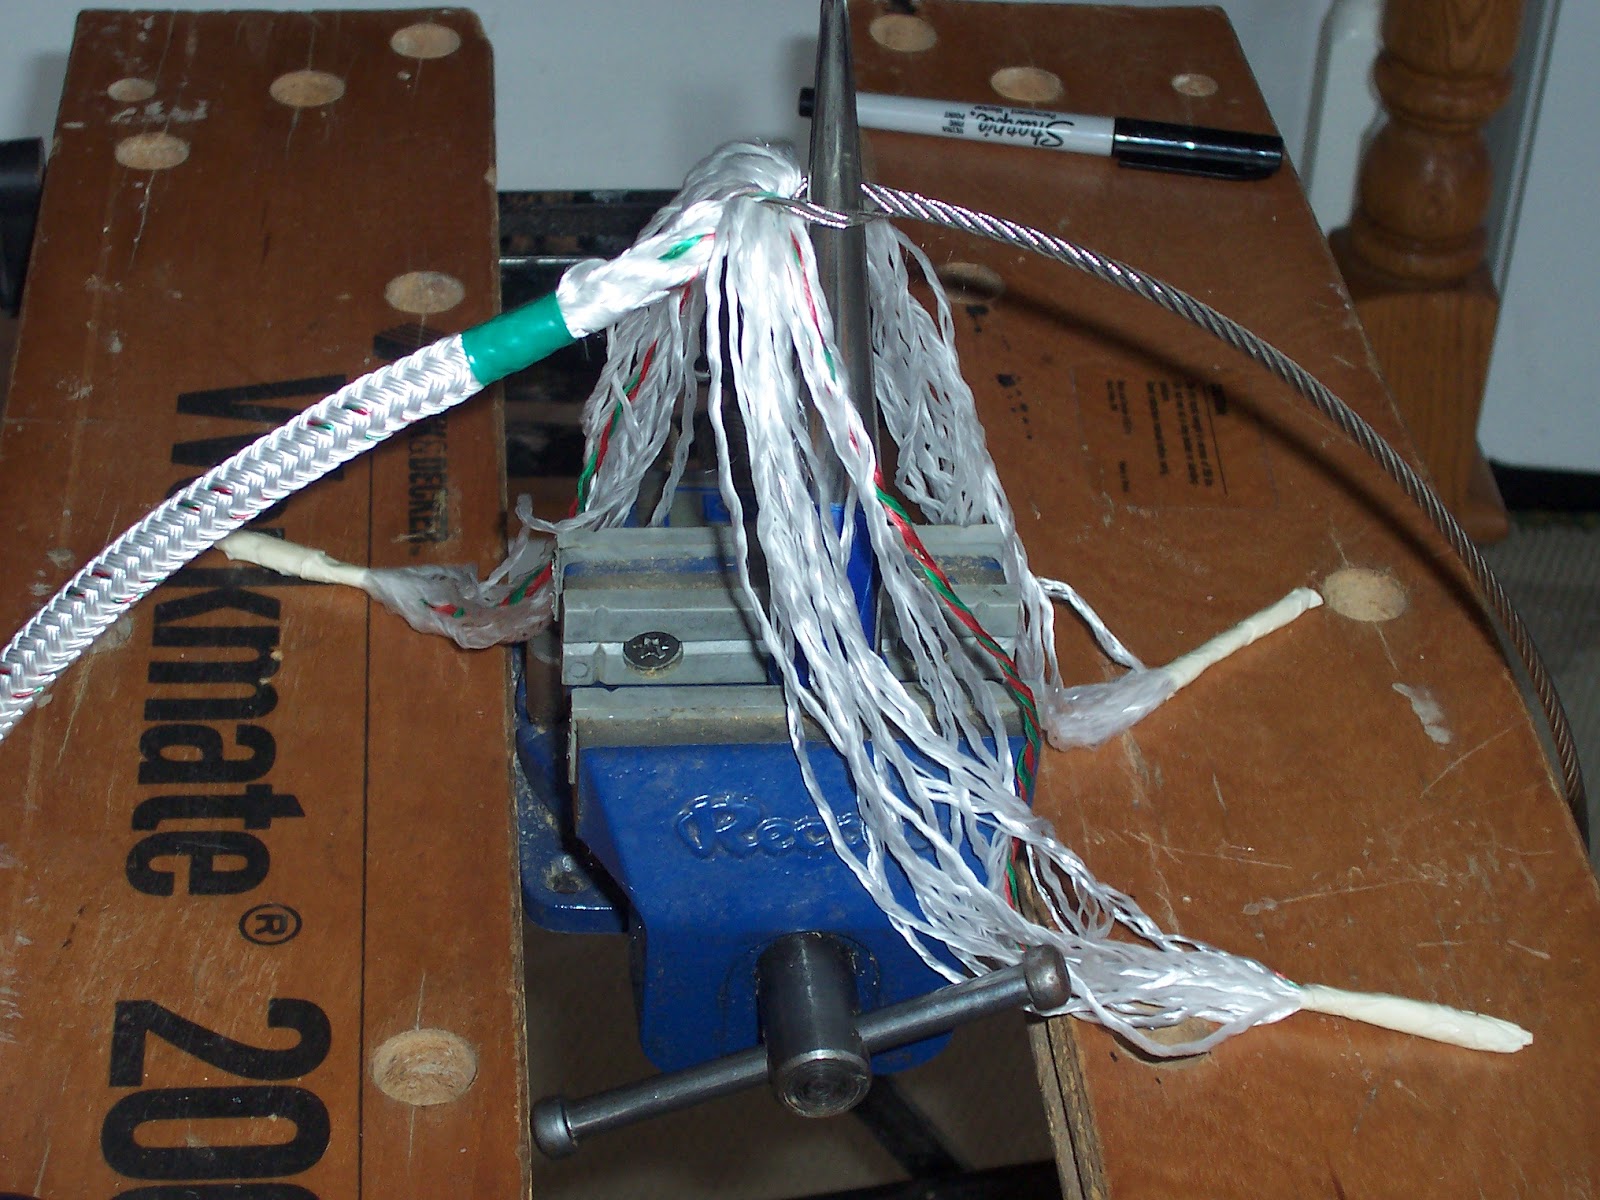
While not necessarily elusive, the splice takes some technique and some patience to complete. In addition to the Swedish fid, you'll need a table and vice, cable/wire cutters, a measuring tape, electrical and/or masking tape, scissors, a hot knife, an awl, bee’s wax, some good lighting and a few hours per splice (until you get the hang of it).


It did take a little practice, but here’s the finished splice. Supposedly this is one of the harder splices to learn and now I feel confident that we can do the splicing ourselves once we're out cruising.


One thing to keep in mind is that with the finished splice, the wire tip will be about 18" or so inside the line, depending on the length of your taper. There are several schools of thought as to where this wire splice should hit when you hoist your sail, and I have to say that we fully agree with Brion's recommendation. When your sail is up, the wire tip inside the line should be just shy of and never wrap around the winch. If it does, the stress of wrapping around a winch will force your wire to wear and chafe the line from the inside, thus shortening the life of your halyard.

Now that the wire-to-rope splices are done, we can focus on replacing the spinnaker and staysail halyards. Those will be all line and need eye splices, but that will be the subject of a different story!

Then comes the fun of installing them all.....