Pages

Wednesday, December 25, 2013

Wishing you and your families a Merry Christmas and Happy New Year!


-The crew of Phoenix


Tuesday, October 1, 2013

Squall-Proof Wind Scoop

Summer weather on the Chesapeake means you need to always be ready for a pop-up storm. We were very impressed with the aft cabin hatch dodger's performance during our recent trip to Still Pond -- we had the hatch open the entire time and the bed down below stayed nice and dry. Great for the aft cabin, but we definitely wanted to improve the airflow in the forward and main cabins while riding out the storms.

Phoenix's forward hatch acts like a wind tunnel when we have it open at anchor! It's 26"x31" and typically provides enough airflow to dry clothes in the forward cabin faster than they line dry on deck! While we love our 4-way wind scoop in lighter air, we needed something a bit more substantial to handle squalls.

We've long admired Terry Sargent's Squall-Proof Wind Scoop design, so we decided to make one for Phoenix. Terry's design is featured in Jim Grant's The Complete Canvas Worker's Guide, and further modifications are mentioned on Terry's blog. Similar in concept to a dorade box, the scoop is essentially a baffled box that fits over your hatch to funnel air down below while keeping the rain on deck.


Terry Sargent's wind scoop design
After taking all of the measurements, we figured we'd need 4 yards of fabric to make the wind scoop. We still have forest green Sunbrella on hand from previous projects, but not enough for this project. It's been a while since we had to buy any Sunbrella, and I was floored by how much the price has gone up. The sixty inch wide marine grade Sunbrella is currently retailing at almost $25/yard! While we know that Sunbrella is great, there had to be a cheaper alternative...

So with some online research we stumbled upon Aqua Gun -- a solution dyed polyester fabric (Sunbrella is solution dyed acrylic). Like acrylic, polyester fabrics are inherently water proof, and from everything we've learned to date, Aqua Gun's UV characteristics are on par with Sunbrella's. The fabric is slightly heavier in weight than marine grade Sunbrella (11oz versus 9.25oz), is 62.5" wide, but has an unfinished edge so you really have about 61" of working width. The draw backs are that it's currently only available from one supplier, and your choices are limited to three colors (blue, forest green, and tan). The HUGE plus, however, is that it's currently selling for $6.88/yard!

We called around to some different commercial canvas shops that are working with both materials to get their thoughts and those that we spoke with said that Aqua Gun was as durable as Sunbrella. At that price, we decided it was worth the experiment. All of our other exterior canvas is forest green so you'd think we'd buy that color, BUT, recent experience with the aft hatch dodger made us realize that on partly sunny days, that dark color gets pretty hot and can heat up the air on its way down below. So we opted for tan, in the hopes that it would be less inclined to blow hot air down the hatch.

Once the fabric arrived we were off to the races. Like Terry we went with a peaked roof for the wind scoop, though we added a few more attachment points and a second topping lift to help shape the scoop and to keep water from pooling on the top. We used 1" strips of heavy duty Velcro to secure the front and inner flaps, and used common sense fasteners to secure the scoop to the hatch base.

We had previously installed common sense studs to the hatch for our everyday hatch covers, so we followed the same pattern and installed the eyelets to the scoop where they aligned with studs on the hatch. With those in place, we did not need the weighted rod at the base of the hatch in Terry's picture above.

The original design called for fastening the lower part of the scoop to the toerails. This wasn't an option for us, and we're not big fans of grommets since they tend to rip out of fabric, we sewed webbing loops to the two endpoints. We ran lines forward to two cleats, and aft to the dorade guards to pull the lower forward edge down. We also sewed webbing loops to the sides of the scoop at the base of the inner flap, which were used to help tighten the flap base. An additional design modification was to add a bottom panel to the forward scoop. This addition helped funnel more air down the hatch compared to the original design.

Side view of the wind scoop
We found that with a little finessing, you can pull the lines tight enough to remove the wrinkles seen here

Back view, attached with common sense fasteners
All flaps in place, ready for some serious weather!
Front flap up with additional  bottom panel for better air flow.
Both flaps up for maximum air flow
The second night we were anchored in Worton we were able to try out the new wind scoop and it worked like a champ! We were able to pull the lines taut and it didn't have any of the wrinkles like in the pictures shown above.

It rained most of the night and we had the forward hatch wide open. There was so much airflow it was almost chilly in the crew's quarters! I'll get a better shot the next time we use the wind scoop, but in the meantime, this one will have to do.

The squall-proof wind scoop in action!


Saturday, September 21, 2013

Destination: Worton Creek

Working for ourselves gives us a great deal of flexibility in our schedules, but on the flip side, it can make planning difficult. Some projects are easy to plan for, but for the most part, we're essentially on call for our clients and never really know when a project will come our way or snowball into something bigger.

After one particularly grueling week where we were both glued to our computers for 10 hour days, we decided we needed a quick getaway to unplug and unwind. We originally wanted to take a longer trip down south, but something short and relaxing seemed more our speed after the week we had! The winds were favorable for a trip north, so we decided to head to another favorite anchorage, Worton Creek.

We've been playing around with different sail configurations lately, and this day we had a comfortable beam reach sail with the main and genoa. Even though the winds were light we made good time, all the while dodging the crab pots that typically pepper the Northern part of the Chesapeake. When we reached Worton Creek, we once again had an anchorage to ourselves.


Unlike Still Pond, which is solely residential, Worton has a handful of marinas tucked in the back. There is plenty of depth in the channel, but you should stay close to the marks because it quickly becomes shallow on either side of the cut. You can get block ice at Green Pointe Landing, and Harbor House restaurant is tucked behind Worton Creek Marina if you're looking to get off the boat. If you're interested in nautical history, there's a real WWII PT boat on the hard back there as well.

Once were settled in it was time for cocktails and dinner.

Taco night!
Just before dusk another boat came into the anchorage, and wouldn't you know it he decided he needed to anchor right next to us! I mean about 15 yards away! At first we thought he was going to come over to visit, but he proceeded to go down below, turn on his generator and let it run all night long! So much for our peaceful first night! Luckily he left first thing the next morning.

After breakfast, while straightening up the cockpit, I was startled to find a tree frog in one of the cubbies. Ok, startled was an understatement -- I got totally girly and didn't want to go in the cubby to get him out! I bribed Bill to do it for me -- and he leapt at the chance to get out of dishes duty to play with a tiny tree frog :-) Once he got him out of the cubby, I had to laugh at myself and admit that our little stowaway was actually pretty cute!
Our little stowaway
No clue how this little guy got on board or how long he'd been there, but with as many flies flying around Worton, he was certainly well fed! We didn't want to put him overboard since we weren't that close to shore and didn't want him to become fish food. We were planning to swim ashore and thought he would freak out if we put him in the dry bag, so we figured he'd be fine in the cockpit until we could free him back home. He hopped back in the cubby, we wounded a few flies to give him a quick meal, and we went ashore to do some exploring. By the time we came back the flies were gone, and so was our little friend. Just as mysteriously as he had appeared, he was gone. At least he had a nice meal before heading out on his own!

The beaches at Worton are a little rocky, so you definitely need some water shoes. There's not as much sea glass as other Chesapeake beaches, but there's still plenty to see. I still haven't gotten a great photo of the bald eagles, but there were plenty soaring around and talking to one another. The hillside is eroding more than we've noticed in previous years and other beach combers have decided to turn some beach debris into "art".


Pretty shallow all the way to the mark on the left
Definitely more erosion than previous years
He was too cute not to photograph -- love their blue tails!
We saw about 6 of these gloves along the shore, but these were photo worthy!


I guess we missed the party
 
Sumac
We stumbled upon some wild sumac bushes (not Poison sumac) that were beginning to bear fruit. Bill new the fruit was used by Native Americans to make a medicinally active summer tea. The leaves and berries are high in tannins, which gives the fruit some antimicrobial properties. We picked some berries to take back the boat. Bill steeped the fruit in boiling water to make us the tea, which tastes almost like a lemony flavored hibiscus tea. You can drink it hot or cold, but don't steep the berries too long or your tea will become bitter.

We were treated to more fabulous sunsets and eventually had to make our way home.
Bill and me at sunset


We set off in the morning with the outgoing tide. With the winds abeam we sailed jib and jigger (genoa and mizzen) until we were well into Rock Creek, comfortably sailing around 6.5 - 7 knots.


Before we knew it we were home. It was a short, but much needed trip. Neither of us were ready to get off the boat, but Phoenix isn't going to finish herself, so soon we'll have to get back to work! :-)


Tuesday, September 17, 2013

Destination: Still Pond

Our friends Tom and Barbara keep their boat on the Virginia side of the Potomac River, and each year we try to meet up on the Bay for a visit. This year, we decided to meet at Still Pond, one of our favorite anchorages on the Chesapeake. Still Pond has a very special place in our hearts -- it was the first anchorage Bill and I shared, was where we spent our first anniversary, was our dog Radar's favorite beach to explore, and is a nice day sail from our home on Rock Creek.

Phoenix's roller headsail is a newer luxury for us since we're both accustomed to hank on sails and changing headsails with the weather conditions, so we decided to use this trip as an opportunity to play around with the roller. We had decent downwind air for most of the run, and found that despite her size, it really doesn't take much wind to get Phoenix moving! With about 1/3 of our 140 genoa unfurled on a downwind run we were consistently moving at 6.5 knots with a neutral helm. But a summer squall was moving up the Bay so we decided to duck into Worton Creek for the night to sit out the storm.

Worton is a fairly protected creek (though open to the west) just south of Still Pond, and we dropped anchor on the south side of the opening, though there were several boats anchored on the northern side of the creek. By the time we dropped our 60 lb CQR, snubbed the anchor chain, secured the deck pipe cover, closed all of the hatches and ports, and settled in, we had about 10 minutes to spare before the winds really piped up and peaked around 30 knots. Nearly all of the rain went around us, but the wind and chop continued for about an hour. Our anchor held well and we had a little chop since we were well protected by the point to the south. The boats across the creek, however, were getting pounded and some were laid over by the wind. It surely did not look like they were having much fun!

Calming down after the storm passed
After it was all said and done we were treated to a wonderful rainbow and sunset, and it was time to relax for the evening.

Should have put the dinghy in to go get that pot of gold!
Sailors' delight
The next day we moved on to Still Pond to relax for a few days and eventually meet up with Tom and Barbara. Still Pond was once a well-kept secret on the Bay, and there were many times that Bill and I would anchor out here and be the only boat on the water. Unfortunately, a few years back it was written up as one of the best anchorages on the Chesapeake, so now you can expect large crowds of powerboaters on the weekends. Mid-week you'll still find a quiet anchorage filled with lots of soaring bald eagles, breathtaking sunsets,  and excellent swimming.

Shortly after dropping the hook, the winds piped up and once again we were sitting through 30+ knot winds, though this time, the winds were accompanied by rain. Still Pond offers great protection from the south and west, but today the winds shifted to the north-east, so we were taking the brunt of the storm on the nose. But we were very impressed with the holding power the CQR -- it definitely holds well in a muddy bottom!

Watching the rain line approaching


Near white out conditions


We decided to test out the flow through characteristics of our cockpit cushions so we left them out during the storm. They were soaked, but when we turned them on their sides,  the water poured out of the Phifertex backs as planned. They were too wet to sit on for dinner, but they were dry by morning. A nice experiment, but we decided to take them down below from now on -- at least until we make the cockpit enclosure! We also took the opportunity to test out the aft cabin hatch dodger. It worked like a champ and we were able to keep the hatch open through the whole storm!

The next morning, after a leisurely breakfast, we decided we wanted some exercise. So we packed our water shoes and bug spray in a dry bag, put on our swim fins and swam ashore. This was our first time walking the beach here without Radar, but we fondly reminisced about all of his favorite sniff spots while combing the beach for sea glass. On a previous trip he took us up a hill near the point that is covered in wild raspberries. We climbed back up the hill, picked a few quart bags full of raspberries, eventually swam back to the boat, and made raspberry jam with our bounty.

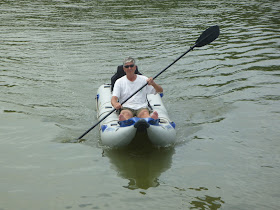
That afternoon we inflated our Sea Eagle inflatable kayak and explored more of the creek.

Bill paddling around in the Sea Eagle kayak
On shore, looking for sea glass
Later that day, Tom and Barbara arrived and joined us for cocktails.

Bill and Tom hanging out in the cockpit, his Tartan -- Tortuga's Lie -- in the background
We were blasted by another storm that night with rain all night long, but Phoenix proved to be extremely comfortable at anchor. We thought our Rutland 913 was going be nothing more than a trickle charge for our batteries, but it was spinning like crazy the whole trip, and we had more than enough power. It was consistently providing more than 10 amps at 30v, and we were charging the cell phones, laptop, ipod, etc. just to use up some of the extra power we were generating!

Tom and Barbara left the next day, just as the weather calmed down. There were only a few boats in the anchorage the whole trip, including Ata Marie, a Nordhavn 56 motorsailer. We swam over to chat with the captain and first mate, who were on their way up north. Like us they were planning to leave the next morning.

Ata Marie at anchor
Our new neighbors and we were treated to another breathtaking sunset. The water and air were so still we almost needed to break out the wind scoop.


The next morning we pulled up anchor, waved goodbye to our new friends and made our way home. Still Pond remains one of our favorite anchorages on the Bay. It's (mid-week) serenity and beauty never disappoint and the raspberry jam was pretty awesome too!

Cheers!


Saturday, August 24, 2013

Canvas Deck Pipe Cover

Phoenix came with a vertical Ideal Windlass with matching deck pipe. She came with an ipe deck spacer for the windlass, and Bill made a teak riser for the deck pipe to align the chain feed with the windlass.

The deck pipe does a great job of feeding the chain down below, but it's missing the chain cover plate so the hole allows water into the anchor locker when it rains.


Our Ideal Windlass and Deck Pipe


The Missing Chain Cover
This could be an issue in the future when we encounter big swells, but with our bow flair and free board this hasn't been an issue to date. Neither of us could justify paying $100 for a new cover plate, so we decided to make a canvas cover for the deck pipe out of some Sunbrella scrap left over from previous projects.

I searched online for pattern ideas, and the best I could find was a reference to making a bonnet-like design. Since I've never made a bonnet before, I went with something a little closer to home and opted for a design more reminiscent of a winch cover. Not that I've ever made a winch cover (we're of the camp that they don't really need covers), but I used a similar design to make a cover for our binnacle compass.


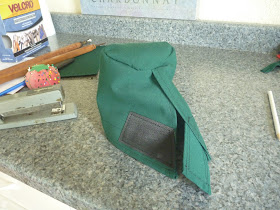
Sunbrella compass cover

The cover was really quite easy to make. Using a compass I drew a circle for the top, then added my seam allowances. The base was a trapezoid with the top measuring the circumference of my Sunbrella circle and the bottom the circumference of my teak riser, plus hem allowances. Unlike a winch or compass cover where the vertical seam is closed, I wanted this one open to fit around the anchor chain, so I needed to add enough for a finished hem. When sewn together, I wanted a slight overlap in the fabric with the flap facing aft, in case we get any deck wash over the bow. And I cut a separate piece of Sunbrella to sew a Velcro strap along the base edge of my cover to keep it in place and secure it under the chain.


Circle layout for the top


Hem line marked and fabric notched to make it easer to sew around the curve

Cut out for the base

Velcro tab added to secure under the anchor chain.


Deck pipe cover in place and ready for action

Water leaks are a thing of the past


A quick tip for those of you like me who use a lot of staples when you're sewing with Sunbrella or other canvas material. I like to keep a bottle opener on hand when working with canvas -- it makes staple removal a breeze and doesn't mar the fabric!


Sunday, August 18, 2013

What a Difference 26 Cabinet Doors Makes!

Many of projects we've completed in the process of rebuilding Phoenix and getting her cruising-ready again, while absolutely vital, often go unnoticed and overlooked. Things like replacing the running/standing rigging, rebuilding the hydraulic steering system, installing a new feathering propeller, running all new electrical wire, etc. are essential to Phoenix's function, they lack a certain "wow factor" and are often overlooked by the casual observer.

And after all of the hours we've put into overhauling Phoenix to date, there was nothing more disheartening than having people stop by to check on our progress, only to ask what we've been working on or to tell us how much work we still have left to do! Admittedly, it can be hard to see all of the strides we've made when the boat is in construction mode, but psychologically, I needed a project that would really showcase our progress and increase Phoenix's livability. So, Bill indulged me and we took a break from working on systems and focused on dressing Phoenix up and giving her a little lipstick!

Our Andromeda's interior was originally mahogany, though much of it was destroyed, damaged, or covered with teak. When Bill purchased her, she did not have a single interior door that was installed. She did have the original doors for a corner cabinet in the main cabin and for the anchor locker, but the corner cabinet's openings had been resized so those doors were no longer useful, and the anchor locker's mahogany trim was destroyed, so those didn't fit either. The previous owner had roughed in several new cabinets, and we've built many as well (there are few more that still need to be built), so having no doors was almost a blessing. At least we had a clean slate to work with and didn't have to match any existing style/design.

Phoenix's interior is now mostly teak (though we've incorporated as much of the original mahogany in as we could), and we've opted for almond laminate and neutral cushion tones for contrast and to lighten things up a bit. We like the richness of the teak, but don't like living in a cave, and definitely did not want a dark boat! To keep with our theme of teak and neutral tones, and to keep our cabinets well ventilated, we decide to go with traditional-looking teak and caning cabinet doors with flush-mounted push button latches.


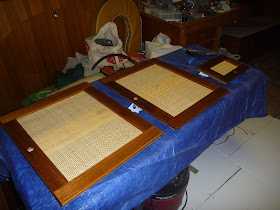
One of the first doors finished and ready for installation
The only problem is that with few exceptions, no two doors are exactly the same size, so each one had to be custom. All 26 of them. To make our lives easier, we broke the project up into sections, and did 2-4 at a time.


Getting their finishing touches


Galley cabinets doors installed, before trim


Forward vanity with new teak door and mahogany medicine cabinet, ready for trim
And while we were dressing her up, Bill started making custom trim pieces to finish off many of the cabinets in the main and forward cabins as well.


Galley cabinet before trim


Galley cabinet after trim


Forward bulkhead with original anchor locker doors when Bill first got the boat


Forward bulkhead and refinished doors with new teak trim


Galley cabinets with trim


Main cabin settee with trim and lower cabinet vent holes
It's amazing how much more finished Phoenix feels with 26 new doors in place and much of the trim work coming together! Well, 29 doors if you count refinishing the anchor locker doors and the mahogany medicine cabinet Bill made for the forward cabin vanity, but who's counting! :-)

Granted, we still have to organize everything behind the doors, but just having them in place makes the boat look and feel like significant progress has been made. There will be a few more cabinets and doors to make on the horizon (at least 6), but tackling this project gave us the wow factor we were hoping for. Not to mention helped us stow and secure things while we're sailing as well!