Pages

Saturday, August 24, 2013

Canvas Deck Pipe Cover

Phoenix came with a vertical Ideal Windlass with matching deck pipe. She came with an ipe deck spacer for the windlass, and Bill made a teak riser for the deck pipe to align the chain feed with the windlass.

The deck pipe does a great job of feeding the chain down below, but it's missing the chain cover plate so the hole allows water into the anchor locker when it rains.


Our Ideal Windlass and Deck Pipe


The Missing Chain Cover
This could be an issue in the future when we encounter big swells, but with our bow flair and free board this hasn't been an issue to date. Neither of us could justify paying $100 for a new cover plate, so we decided to make a canvas cover for the deck pipe out of some Sunbrella scrap left over from previous projects.

I searched online for pattern ideas, and the best I could find was a reference to making a bonnet-like design. Since I've never made a bonnet before, I went with something a little closer to home and opted for a design more reminiscent of a winch cover. Not that I've ever made a winch cover (we're of the camp that they don't really need covers), but I used a similar design to make a cover for our binnacle compass.


Sunbrella compass cover

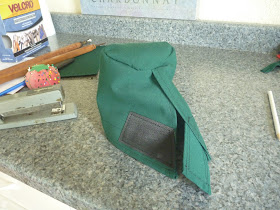
The cover was really quite easy to make. Using a compass I drew a circle for the top, then added my seam allowances. The base was a trapezoid with the top measuring the circumference of my Sunbrella circle and the bottom the circumference of my teak riser, plus hem allowances. Unlike a winch or compass cover where the vertical seam is closed, I wanted this one open to fit around the anchor chain, so I needed to add enough for a finished hem. When sewn together, I wanted a slight overlap in the fabric with the flap facing aft, in case we get any deck wash over the bow. And I cut a separate piece of Sunbrella to sew a Velcro strap along the base edge of my cover to keep it in place and secure it under the chain.


Circle layout for the top


Hem line marked and fabric notched to make it easer to sew around the curve

Cut out for the base

Velcro tab added to secure under the anchor chain.


Deck pipe cover in place and ready for action

Water leaks are a thing of the past


A quick tip for those of you like me who use a lot of staples when you're sewing with Sunbrella or other canvas material. I like to keep a bottle opener on hand when working with canvas -- it makes staple removal a breeze and doesn't mar the fabric!



Sunday, August 18, 2013

What a Difference 26 Cabinet Doors Makes!

Many of projects we've completed in the process of rebuilding Phoenix and getting her cruising-ready again, while absolutely vital, often go unnoticed and overlooked. Things like replacing the running/standing rigging, rebuilding the hydraulic steering system, installing a new feathering propeller, running all new electrical wire, etc. are essential to Phoenix's function, they lack a certain "wow factor" and are often overlooked by the casual observer.

And after all of the hours we've put into overhauling Phoenix to date, there was nothing more disheartening than having people stop by to check on our progress, only to ask what we've been working on or to tell us how much work we still have left to do! Admittedly, it can be hard to see all of the strides we've made when the boat is in construction mode, but psychologically, I needed a project that would really showcase our progress and increase Phoenix's livability. So, Bill indulged me and we took a break from working on systems and focused on dressing Phoenix up and giving her a little lipstick!

Our Andromeda's interior was originally mahogany, though much of it was destroyed, damaged, or covered with teak. When Bill purchased her, she did not have a single interior door that was installed. She did have the original doors for a corner cabinet in the main cabin and for the anchor locker, but the corner cabinet's openings had been resized so those doors were no longer useful, and the anchor locker's mahogany trim was destroyed, so those didn't fit either. The previous owner had roughed in several new cabinets, and we've built many as well (there are few more that still need to be built), so having no doors was almost a blessing. At least we had a clean slate to work with and didn't have to match any existing style/design.

Phoenix's interior is now mostly teak (though we've incorporated as much of the original mahogany in as we could), and we've opted for almond laminate and neutral cushion tones for contrast and to lighten things up a bit. We like the richness of the teak, but don't like living in a cave, and definitely did not want a dark boat! To keep with our theme of teak and neutral tones, and to keep our cabinets well ventilated, we decide to go with traditional-looking teak and caning cabinet doors with flush-mounted push button latches.


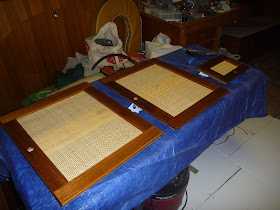
One of the first doors finished and ready for installation
The only problem is that with few exceptions, no two doors are exactly the same size, so each one had to be custom. All 26 of them. To make our lives easier, we broke the project up into sections, and did 2-4 at a time.


Getting their finishing touches


Galley cabinets doors installed, before trim


Forward vanity with new teak door and mahogany medicine cabinet, ready for trim
And while we were dressing her up, Bill started making custom trim pieces to finish off many of the cabinets in the main and forward cabins as well.


Galley cabinet before trim


Galley cabinet after trim


Forward bulkhead with original anchor locker doors when Bill first got the boat


Forward bulkhead and refinished doors with new teak trim


Galley cabinets with trim


Main cabin settee with trim and lower cabinet vent holes
It's amazing how much more finished Phoenix feels with 26 new doors in place and much of the trim work coming together! Well, 29 doors if you count refinishing the anchor locker doors and the mahogany medicine cabinet Bill made for the forward cabin vanity, but who's counting! :-)

Granted, we still have to organize everything behind the doors, but just having them in place makes the boat look and feel like significant progress has been made. There will be a few more cabinets and doors to make on the horizon (at least 6), but tackling this project gave us the wow factor we were hoping for. Not to mention helped us stow and secure things while we're sailing as well!